
Blooming
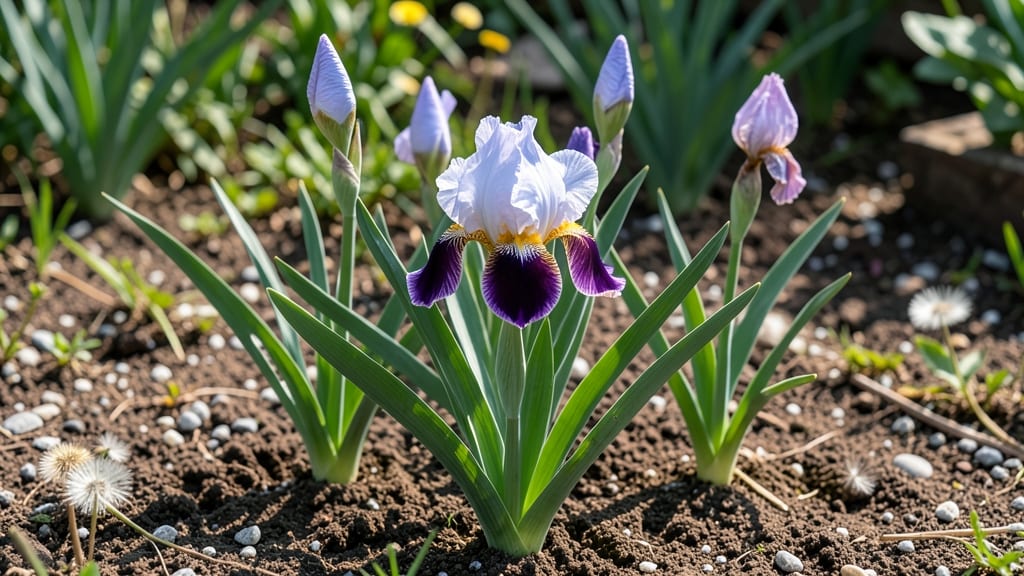
Your irises' reblooming journey starts with understanding each perfect bloom stage—because timing is everything. 🌸 From the first fuzzy bud peeking through its sheath in early spring to the dried seed pods of late summer, each phase needs specific care to ensure your plants return stronger next year.
I've tracked my irises' stages for years, and the difference between a showstopper display and a lackluster performance comes down to what you do (and when) at each milestone.
The magic begins in late spring when those sword-like leaves unfurl, signaling the plant is storing energy for blooms. This is when you should fertilize lightly—too much nitrogen now delays flowering. Then comes bud formation (usually May-June), where those iconic trumpet shapes appear.
Here's where pruning dead foliage from last year matters: leave the leaves until they yellow naturally, but remove any blackened or diseased ones immediately. The buds themselves need protection from slugs and snails, so a light barrier of diatomaceous earth around the base works wonders.
When those velvety petals finally open in June-July, resist the urge to cut the blooms immediately—they need 4-6 weeks on the plant to develop seeds for next year's flowers. After blooming, you'll notice the seed pods forming, followed by the leaves browning.
This is your plant's natural dormancy signal: stop fertilizing and let it rest. The key to reblooming success lies in this post-bloom care—what you do now determines next spring's performance.
By understanding these stages, you'll know exactly when to fertilize, prune, and protect your irises for repeat blooming year after year. The first year might feel like guesswork, but after that, your garden will be packed with irises that bloom reliably—just like mine do now.
The secret isn't complicated, but the timing is everything.
📚 In This Guide
- What you need
- Instructions
- Tips and common mistakes
- Wrapping up and next steps
What you need
- ● Iris rhizomes: Healthy, disease-free rhizomes (preferably Iris germanica or Iris xiphium for reblooming varieties). Aim for 3–5 rhizomes per planting spot.
- ● Well-draining soil: A mix of native soil, compost (20–30%), and coarse sand or perlite (10–20%) to prevent rot. Test soil pH (ideal range: 6.0–7.0).
- ● Garden fork or trowel: For digging and transplanting rhizomes without damaging roots.
- ● Pruners or sharp scissors: Sterilized tools for trimming dead foliage (after blooming) and dividing clumps.
- ● Organic fertilizer: Balanced, slow-release formula (e.g., 10-10-10) or iris-specific fertilizer. Apply 2–3 times per year (spring, summer, fall).
- ● Mulch: 2–3 inches of organic mulch (e.g., straw or shredded bark) to retain moisture and regulate soil temperature.
- ● Watering can or hose with a gentle spray nozzle: Irises need 1–1.5 inches of water weekly (adjust for drought/climate).
- ○ Stakes or plant labels: Optional but helpful for tracking varieties and reblooming progress.
- ● Soil moisture meter: To monitor watering needs without over-saturating the rhizomes.
- ● Epsom salt (magnesium sulfate): 1 tablespoon per gallon of water, applied monthly during growing season for vibrant blooms.
- ● Compost tea or liquid seaweed fertilizer: Boosts microbial activity and reblooming vigor.
- ● Protective netting: Shields blooms from pests like iris borers (especially in humid climates).
- ● Garden journal: Track bloom stages, weather, and fertilizer applications for future reference!
Month-by-month guide to perfect iris bloom timing
Here's how to sync your iris's natural cycle with seasonal care for flawless reblooming.
🌱 Step 1: Early Spring (March-April) - Rhizome Prep and First Growth
After winter dormancy, your iris rhizomes need 60-65°F soil temperatures to wake up. I gently brush away old mulch to expose the tops—about 1/3 of the rhizome should show. This prevents rot while allowing light to trigger new growth. Look for small buds forming along the rhizome's top edge; these are your first sign of spring activity.
Apply a balanced 10-10-10 fertilizer at half-strength when you see 2-3 inch green shoots. Too much nitrogen now encourages leaf growth over flower buds. Water lightly but consistently—1 inch per week—keeping soil moist but never soggy. You'll notice leaves unfurling within 3-4 weeks if conditions are right.
☀️ Step 2: Late Spring (May-June) - Flower Bud Development
This is the critical window where flower buds form. Your iris needs full sun (6+ hours daily) now—shade causes weak stems and smaller blooms. I stake taller varieties (like 'Blue Flag') with 3-inch bamboo stakes to prevent wind damage before buds appear. Watch for 1-inch tall flower stalks emerging from leaf bases; these are your bloom indicators.
Reduce watering slightly as buds form—½ inch per week. Overwatering now causes buds to split or rot before opening. I deadhead spent blooms immediately (cut stems 2 inches above ground) to redirect energy to next year's flowers. You'll see new buds forming along the rhizome within 2-3 weeks of proper care.
🌿 Step 3: Summer (July-August) - Post-Bloom Recovery
After flowering, let foliage yellow naturally—it's storing energy for next year. I avoid cutting leaves until they brown completely (usually 6-8 weeks post-bloom). During heatwaves, water deeply twice weekly to maintain 2 inches of soil moisture. Mulch with 2 inches of shredded bark to retain moisture and regulate soil temperature.
Apply a low-nitrogen fertilizer (5-10-10) in early August to encourage root growth without stimulating new foliage. You'll notice rhizomes thickening slightly as they prepare for dormancy. This is when I divide congested clumps—dig when soil is 60°F and replant immediately.
⏰ Step 4: Fall (September-October) - Dormancy Preparation
Reduce watering to 1 inch every 2 weeks as temperatures drop. I stop fertilizing completely by mid-October to let rhizomes harden off. Look for leaves turning yellow—this signals natural dormancy. Cut back foliage to 2 inches above ground only after it's completely brown (usually November in most climates).
Apply a 3-inch layer of mulch (straw or leaves) to insulate rhizomes through winter. In colder zones, I add a thin layer of evergreen boughs for extra protection. Proper dormancy now ensures vibrant reblooming next spring—your reward for patient seasonal care.
🌱 Step 5: Winter (November-February) - Dormant Care
Leave rhizomes undisturbed during winter. In snowy climates, the mulch layer protects against freeze-thaw cycles. I check occasionally that mulch hasn't compacted—fluff it if needed. You won't see growth, but roots remain active at 40-50°F soil temps, preparing for spring.
This is the only time I don't water at all. The natural freeze-thaw cycle helps break down old growth. By late February, I start watching for tiny green tips emerging—your first sign spring has arrived. Timing your care to these natural cues ensures perfect reblooming every season.
Tips & tricks for perfect iris reblooming timing
These seasoned strategies will help you achieve flawless iris blooms year after year—no guesswork required.
The Soil Temperature Secret: That 60-65°F range in early spring isn't just a suggestion—it's the biological trigger for iris awakening. Use a soil thermometer to verify temperatures before taking action. If your soil runs cooler (common in northern climates), consider using black plastic mulch to absorb and retain heat. Warmer soil speeds up rhizome activation by up to 30%, giving you that critical head start for spring growth.
Visual Cues Over Calendars: Instead of relying solely on months, watch for these natural indicators: When you see those tiny green tips emerging in late February, that's your cue to begin Step 1. The 2-3 inch shoot mark isn't arbitrary—it's when rhizomes have stored enough energy to support new growth. I've learned this the hard way after rushing fertilizer applications too early and stunting bloom development.
Bud Development Watch: Those 1-inch tall flower stalks in Step 2 are your most reliable bloom predictor. Measure them against your thumb—when they reach about the width of your thumb's first joint, that's when you should reduce watering to ½ inch per week. This precise timing prevents the classic "bud rot" problem I've seen in overwatered iris beds during peak bud formation.
Dormancy Timing Precision: The 6-8 week window for post-bloom leaf yellowing is your natural countdown to dormancy. Mark your calendar from when you see the first yellow leaves—this gives you an exact 6-8 week target for when to cut back foliage. I've found this method far more reliable than guessing by month, especially in variable climates where seasons shift unpredictably.
Pro Tips for Iris Bloom Stages
- These seasoned strategies will help you achieve flawless iris blooms year after year—no guesswork required.
- The Soil Temperature Secret: That 60-65°F range in early spring isn't just a suggestion—it's the biological trigger f...
- Visual Cues Over Calendars: Instead of relying solely on months, watch for these natural indicators: When you see tho...
Frequently asked questions
Got questions about iris blooms? You’re not alone! Here are some of the most common concerns gardeners have when planning for those stunning reblooming stages.
When do iris plants typically bloom for the first time after planting?
Newly planted iris rhizomes usually take 1-2 years to establish roots before their first bloom. If you planted in early spring, expect a late spring or early summer show the following year. Patience pays off—healthy rhizomes reward you with vibrant blooms once they’re settled!
How can I encourage my iris to rebloom reliably each year?
Reblooming iris thrive with consistent care: prune spent blooms promptly, fertilize lightly in early spring (high-phosphorus, low-nitrogen), and ensure they get 6+ hours of sunlight. Deadheading and dividing clumps every 3-4 years also boosts vigor. Avoid overwatering—they prefer well-drained soil!
What should I do if my iris blooms but then stops reblooming?
Common culprits include overcrowding, poor drainage, or nutrient depletion. Try dividing the rhizomes, amending soil with compost, or moving them to a sunnier spot. If blooms appear but drop quickly, check for pests (like iris borers) or fungal issues. A little troubleshooting goes a long way!
Can I force iris to bloom out of their natural season?
While iris are not as flexible as some perennials, you can delay or advance blooms slightly by adjusting care. For earlier blooms, fertilize in late winter and water moderately. To extend the season, mulch heavily in fall and prune lightly. Just don’t expect miracles—iris follow their own rhythm!
Are there iris varieties that bloom earlier or later than others?
Bearded iris
typically bloom in late spring, while Siberian iris (like ‘Caesar’s Brother’) often bloom earlier (April–May). Reblooming varieties (e.g., ‘Florence Scott’) may produce a second flush in late summer with the right care. Check seed packets or plant tags for specifics!
Wrapping up and next steps
Understanding the iris bloom stages is your secret weapon for a stunning, repeat-performance garden! 🌸 From early spring’s bold awakening to late summer’s final flourish, each phase offers clues to nurture your irises—whether you’re a seasoned gardener or just starting.
Now that you’re armed with timing, care tips, and troubleshooting, take the next step: grab your pruners, sketch a planting map, or share your progress with fellow iris lovers. Your blooms are about to thrive—let’s make it happen!